Don't miss any update from this blog like my Facebook page click here
Past few days had been very hectic and I almost forgot to do a post on a Decorative Tray that I made from Newspaper. So here is my promised post.
1. Gather all the required material as I have shown below.
2. Cut 5-6 Inches broad strips of paper as shown below.
3. Now roll the paper strip with the help of stick. As shown in image below. Remember you have to take out the stick once paper is rolled completely. So don't roll it too loose or too tight.
4. Take the stick out slowly. Now stick the end of paper with glue as shown here.
5. Make good amount of rolls as you will need lot of them. I made around 50-60
6. Now image for this step is missing. But believe me it's very easy. Take two rectangular card board of same size. Size depends on your choice. On one cardboard start sticking one end of paper rolls around 2 inches should be on the cardboard. Place one after the another keeping space of around 2.5-3 inches between them. Make sure that there is one roll glued on every corner of cardboard.
7. When you are done all around the edges of cardboard then glue the other cardboard of same size on top of it and let it dry.
8. Now pickup one roll and start weaving on the rolls that you glued on the cardboard earlier. Pattern should be once in then out as shown in image below.
9. When the roll is about to finish then insert another roll inside it and keep weaving until you reach desired height.
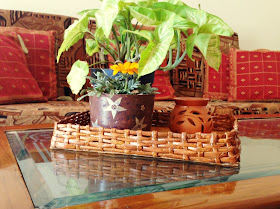
Looks no less than wicker basket and is strong enough to hold some stuff :)
I keep changing stuff that tray holds. Have a look........
And my hubs liked it so much that he is taking this tray to his office and will try to be little organized :) Well that's a great reward I got.
Do let me know how do you find it.
.JPG)
.JPG)
.JPG)
.JPG)
.JPG)


Wow , Awesome tutorial Disha. Will give it a try soon.
ReplyDeleteThanks Suganthi!! I am sure your's will come out amazing. Do share pictures once you are done :)
DeleteWow, the final produt doesn't even look like its made from paper...
ReplyDeleteThat's the beauty of this project Vasudha!! Thanks for dropping by!!
Deletesimple materiels but it's very useful and amazing
ReplyDeletesimple materials but very useful and great !
ReplyDeleteu r great and so r your creations that inspired me as preschool teacher, thanx a lot ! Good Luck 2 u !
ReplyDeleteThanks a lot Effendi Annisa, I am glad that you found this tutorial useful. Thanks for stopping by!
Deletehad done it with just news papers and tissues..... but this one is really good
ReplyDelete